Integration

If you are an application software vendor,
you may want to embed some functions in your software to
facilitate your customers for the TurboMeeting integration.
You are welcome to contact RHUB for integration support

Integration with the RHUB Web Conferencing & Remote Support Solutions

The following is a set of interfaces to integrate the RHUB server with your web or Windows based applications and audio conferencing.

You can call the following two URLs to start and join a meeting.

URL to start a unscheduled meeting

https://your_meeting_server_address/as/wapi/goto_downloader?role=host&email=xxx&user_password=yyy

where "xxx" is your email address and "yyy" is your password. If you are concerned with the password displayed in the URL, use POST.

URL to start a scheduled meeting

https://your_meeting_server_address/as/wapi/goto_downloader?role=host&email=xxx&user_password=yyy&meeting_id=zzz&password=ppp

where "xxx" is your email address, "yyy" is your password, "zzz" is your meeting ID, and "ppp" is your meeting password. If you are concerned with the passwords displayed in the URL, use POST.

URL to schedule a meeting

https://your_meeting_server_address/as/wapi/schedule_meeting?meeting_type=0&email=johndoe@rhubcom.com&user_password=pwd&password=&is_recurring=Y&meeting_topic=this_is_a_test&integration_code=test&call_number=408-345-9021&attendee_access_code=2393029&start_time=2014/07/25 15:30&end_time=2014/07/25 14:30

where
  • "meeting_type" is your meeting type. 0: interactive meeting, 1: remote support, 2: remote access, 3: webinar, 4: HD video conference,
  • "email" is your email,
  • "user_password" is your account password,
  • "password" is your meeting password.
  • "is_recurring" indicates whether the meeting is recursive (Y) or not (N),
  • "meeting_topic" is your subject,  
  • "integration_code" is integration code for simple authentication, which is defined on the System Setting page of the web admin console.
  • "call_number" is the phone number to dial-in to the audio conference. It is used to form meeting invitations.
  • "attendee_access_code" is the audio conference access code. It is used to form meeting invitations.
  • "start_time" is the meeting start time. It is in the format of "YYYY/MM/DD HH:MM" (year/month/day, hour:minute). If a meeting is a recursive one, leave this empty.
  • "end_time" is the meeting start time. It is in the format of "YYYY/MM/DD HH:MM" (year/month/day, hour:minute). If a meeting is a recursive one, leave this empty.

If you are concerned with the passwords displayed in the URL, use POST.


URL to join a meeting

https://your_meeting_server_address/as/wapi/goto_downloader?role=attendee&name=xxx&meeting_id=yyy&password=zzz&sumbit=submit

where "xxx" is your name, "yyy" meeting ID, and "zzz" meeting password.

You can use the following custom URLs to start or join a meeting:
 

Join a meeting:

turbomeeting80://?role=attendee&meeting_id=&meeting_password=&name=&account_server_ip=


Host a meeting:

turbomeeting80://?role=host&email=&user_password=&account_server_ip=


where account_server_ip is the server address and other parameters are self explanatory.


For Android developers, you can use other means such as "intent" to launch the TurboMeeting client by using the package name: "com.rhubcom.turbomeeting80", and scheme name: "turbomeeting80". For example,


intent://?role=attendee&meeting_id=&meeting_password=&name=
&account_server_ip=#Intent;scheme=turbomeeting80;package=com.rhubcom.turbomeeting80;end


intent://?role=host&email=&user_password=
&account_server_ip=#Intent;scheme=turbomeeting80;package=com.rhubcom.turbomeeting80;end


The keyword turbomeeting80 is associated the mobile APP version. It may change. If you run into difficulty, please contact support@rhubcom.com.


The following are two sample Apps that launch TurboMeeting:


You can use frame (or iframe) to embed a web viewer into any of your web page by the following URL:

https://your_meeting_server_address/id=yyy&name=xxx&password=zzz


You can place Start and Join Meeting buttons in your desktop applications on PC or MAC and let users launch TurboMeeting meetings just from your applications.

The following is a suggested workflow:

  1. Test if TurboMeeting has been installed. If not, call the web-based APIs to let users start and join meeting from the web. After this first-time web-based API call, TurboMeeting is installed.
  2. If TurboMeeting is installed, find the TurboMeeting executable path, generate a temporary file called "Command File" to contain the parameters needed by TurboMeeting and execute the following command line:

TurboMeeting-Path --cmd Command-File-Path

Here are sample command lines for Windows:


C:\Documents and Settings\Administrator\Application Data\TurboMeeting\TurboMeeting\TurboMeeting.exe --cmd c:\MyApplication\LaunchTM.txt

For Windows, you can find the TurboMeeting.exe path by clicking "Start", "All Programs", and "TurboMeeting". Then right-click "Start Meeting" and select "Properties". The property dialog displays the TurboMeeting.exe path. Another quick way to find the TurboMeeting.exe path is to right-click the TurboMeeting icon on your desktop and then select "Properties". However, the desktop icon can be easily removed by users.


The TurboMeeting.exe path can be programmatically retrieved by your application. Click here to download a sample written in VC++.
 

For MAC, execute the same command line by using NSTask:


NSTask *oCommandLine = [[NSTask alloc] init];
oCommandLine.launchPath = sTurboMeetingExecutablePath;
oCommandLine.arguments = @[@"--cmd", sCommandLineFilePath];

You can find the MAC executable location by reading the file "~/.TurboMeeting/TurboMeeting.property". Download a sample MAC launcher source code. You can run the MAC launcher executable to test it.


Depending on the values in the Command File, the above will start or join a meeting. After TurboMeeting is launched, the Command File will be removed by TurboMeeting in order to keep the parameters inside the file secured.

The Command File is defined in an XML format. Below are two samples, one for joining a meeting, the other for starting a meeting:

Join a Meeting:				
<Action>Join</Action> 
<ServerAddress>turbomeet.com</ServerAddress> 
<ServerPort>80</ServerPort> 
<MeetingPassword>123</MeetingPassword> 
<MeetingId>8813-7455</MeetingId> 
<AttendeeName>Brian Smith</AttendeeName> 
<Email></Email>
<ViewerInFullScreen>N</ViewerInFullScreen>
<Caller></Caller>
Start a Meeting:
<Action>Host</Action> 
<ServerAddress>turbomeet.com</ServerAddress> 
<ServerPort>80</ServerPort> 
<MeetingPassword></MeetingPassword> 
<MeetingId></MeetingId> 
<AttendeeName></AttendeeName> 
<Email>johdoe@aceme.com</Email> 
<UserPassword>password</UserPassword> 
<MeetingType>0</MeetingType> 
<StartMeetingNow>Y</StartMeetingNow>  
<ViewerInFullScreen>N</ViewerInFullScreen>
<Caller></Caller>
<Timeout>-1</Timeout>		
The values of the XML elements are defined below:


<Action>: "Host" if it is to host a meeting. "Join" if it is to join a meeting

<ServerAddress>:  The TurboMeeting server address

<ServerPort>: One of the available TurboMeeting server Ports: 80, 443 or 8889. Fill in 80 if it is available.

<MeetingPassword>: Meeting password, used only when Action = Join

<MeetingId>: Meeting ID, required when Action = Join.

<AttendeeName>: Attendee name, required only when Action = Join

<Email>: The host email address, required only when Action = Host

<UserPassword>: The host password at the TurboMeeting server, required only when Action = Host

<MeetingType>: "0" for Interactive Meeting; "1" for remote support; "2" for remote access; "3" for seminar. This is required only when the Action is Host.

<StartMeetingNow> "Y" to start a meeting right away; "N" to start TurboMeeting and sign in. This is required only when Action = Host

<ViewerInFullScreen>: "Y": forces TurboMeeting viewer windows to take over a full screen. This is used to demand the max attention from attendees.

<Caller>: It is the OEM ID. Leave it empty.

<Timeout>: Set the timeout for a meeting in seconds. "-1" means there is no timeout.

You can stop an active meeting by using the following URL:


https://your_meeting_server_address/as/wapi/stop_meeting_by_service?meeting_id=xxx&email=yyy&password=zzz


where "xxx" is the meeting ID, "yyy" a system administrator email, and "zzz" the system administrator password. To protect the system administrator account credential, use HTTPS if you can.

You can get all active meetings by using the following URL:


http://your_meeting_server_address/as/wapi/service/get_active_meeting?integration_code=xxx


where "xxx" is the code for the integration, which can be set on the system setting page. It returns all meeting in XML format. You need to check the option "Allow to retrieve active meetings" on the system settings page.

You can get all participants in an active meeting by using the following URL:


http://your_meeting_server_address/as/wapi/service/get_meeting_participant_list?integration_code=test&meeting_id=yyy

where "xxx" is the code for the integration and yyy is an active meeting ID. You need to check the option "Allow to retrieve active meetings" on the system settings page.


Each line in the return data represents a participant, which is delimited by a tab character:


participant_name\tparticipant_device_type\taudio_mode\tparticipant_ip_address\tjoin_time


The participant_device_type is defined by: 0 for PC, 1 for MAC, 2 for Linux, 4 for iOS, 7 for Android. The audo mode is defined by: 0 for computer audio and free talk, 1 for computer audio and push-to-talk, 2 for telephone.

You may want to publish some scheduled meetings on your website so that visitors can easily join the meetings such as a sales or training seminar. The steps below show you how to publish those meetings on your website.

  1. Schedule a meeting. On the schedule meeting dialog, check the "To be published" 
  2. Login to the web console and click "Manage Meetings". Look for the section "The URL to publish the scheduled public meetings in HTML". You can also use "The URL to publish the scheduled public meetings in XML", which will give the flexibility to integrate the list of scheduled meeting with any of your applications.
  3. Paste the URL on your website. To embed the list of scheduled meetings into your web page, use iFrame.
You can integrate with TurboMeeting any audio conferencing services including your own audio conferencing bridge. The integration is as easy as inputting a call number to the TurboMeeting system. The call number is shown in your meeting invitation messages and the TurboMeeting meeting control panel automatically.

Follow the steps below:

  1. Login to the web console
  2. Click the "Manage Meetings" link
  3. Look for the audio conferencing integration section. Check the option "My audio conferencing number" and input your audio conferencing number.
  4. If you would like to use TurboMeeting ID as the audio conference code, check "Use Meeting ID as the audio conference Access Code".
To facilitate the TurboMeeting deployment to all employees in your organization, you may want to use your own server to do the user authentication. For example, you can use your CRM system or LDAP to authenticate TurboMeeting users so that you can manage users in a single system.

In order to do the integration, you need to set up an adapter, which is a web server to

1. Accept a user authentication URL call from the TurboMeeting server

2. Parse the URL and send a user authentication request to your server

3. Based on the response from your server, return a proper response in XML to the TurboMeeting server.

The parameters in the URL calling from the TurboMeeting server are:
email 
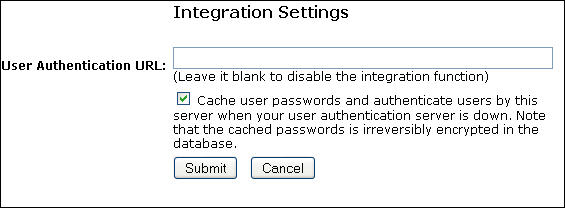
The email address that a user inputs to a TurboMeeting client. Note that the email address can be any string, for example, a user name. It depends on the user authentication format of your server.  
password The password that a user inputs to a TurboMeeting client. Note that the password is secured between TurboMeeting client and server via both proprietary encryption and SSL encryption. The transmission of the password between the TurboMeeting server and your server  can be encrypted by SSL if you instructs the TurboMeeting server to use a HTTPS user authentication URL.


The response from your server to the TurboMeeting server should follow the format below:

<__Return__>
<__Status__>SUCCEED</__Status__>
<__Reason__></__Reason__>
<__FirstName__>John</__FirstName__>
<__LastName__>Doe</__LastName__>
<__Phone__>408-939-2919</__Phone__>
<__UserId__>2910-21202</__UserId__>
<__IsAdministrator__>Y</__IsAdministrator__>
<__PrivilegeInteractiveMeeting__>Y</__PrivilegeInteractiveMeeting__>
<__PrivilegeSeminar__>Y</__PrivilegeSeminar__>
<__PrivilegeRemoteSupport__>Y</__PrivilegeRemoteSupport__>
<__PrivilegeRemoteAccess__>Y</__PrivilegeRemoteAccess__>
<__PrivilegeSendFile__>Y</__PrivilegeSendFile__>
<__PrivilegeChat__>Y</__PrivilegeChat__>
<__PrivilegeRecord__>Y</__PrivilegeRecord__>
<__VideoConference__>Y</__VideoConference__>
<__UserGroupName__></__UserGroupName__>
</__Return__>

where

<__Status__> has a value of either SUCCEED or FAILED depending on whether the user authentication succeeds or not.

<__Reason__> needs a value when the Status is FAILED. The reason for failed user authentication will be displayed to TurboMeeting users.

<__FirstName__> is the first name of an authenticated user.

<__LastName__> is the last name of an authenticated user.

<__Phone__> is the phone of an authenticated user.

<__UserId__> is the user ID of an authenticated user in your server.

<__IsAdministrator__> has a value of either "Y" or "N" depending on whether the user is a system administrator.

<__PrivilegeInteractiveMeeting__> has a value of either "Y" or "N" depending on whether the user can hold an interactive meeting.

<__PrivilegeSeminar__> has a value of either "Y" or "N" depending on whether the user can host a seminar.

<__PrivilegeRemoteSupport__> has a value of either "Y" or "N" depending on whether the user can hold a remote support session.

<__PrivilegeRemoteAccess__> has a value of either "Y" or "N" depending on whether the user can host a remote access session.

<__PrivilegeSendFile__> has a value of either "Y" or "N" depending on whether the user can send files during a meeting session.

<__PrivilegeChat__> has a value of either "Y" or "N" depending on whether the user can chat during a meeting session.

<__PrivilegeRecord__> has a value of either "Y" or "N" depending on whether the user can record during a meeting session.

<__VideoConference__> has a value of either "Y" or "N" depending on whether the user can do multipoint webcam based video conferencing during a meeting session.

<__UserGroupName__> defines the user group this user belongs to.

After you set up the integration adapter, you need to tell the TurboMeeting server your user authentication URL:

    1. Go to your TurboMeeting server web administration console 2. Click the "Application Server" link under the Integration section. You will see the following page:


    On the page, input your user authentication URL to accept calls from the TurboMeeting server. You can use either HTTP or HTTPS. However, if you use HTTPS, make sure your adapter response HTTPS header contains the field "Content-Length".

    https://ldap.acme.com/authentication.aspx?email=johndoe@aceme.com&password=test

    You can choose to have the TurboMeeting server cache user passwords. With cached passwords, when your adapter is down, the TurboMeeting server will conduct the user authentication independently based on the previous successes. The cached passwords are irreversibly encrypted and saved in the TurboMeeting server database.

    If you want to delete a user profile from the TurboMeeting server, your adapter returns <__Status__>Deleted<__UserID__>xxxx where xxxx is the unique user id in your server for the user. The user id, which is a part of authentication return, is saved at the TurboMeeting server after successful authentication. You can also manually delete the user profile using the web-based administration console. Do not add any parameters in the URL. The TurboMeeting server will attach two parameters to your URL and the final URL calling your adapter will be like:
You can easily integrate RHUB servers with your LDAP servers including Active Directory servers for user authentication. You just fill in one form and it is done (see the figure below).

Note that if your LDAP supports multiple domains, use the port 3268.

All RHUB servers come with a webinar registration function to facilitate your webinar hosting. The webinar registration function allows you to:

  1. Create and edit webinars
  2. Publish webinars together with a registration form
  3. Collect registrations, which can be exported to an Excel sheet.
There are two ways to integrate the registration form to your website: use the system built-in webinar registration page or embed the registration form into your own web page

1. Use the system built-in webinar registration page

Goto the "Webinar Registration" section on your web-based admin console and open "URLs". You will see three URLs shown in the figure below. Choose the first URL and publish it on your website.


2. Embed the registration into your own web page

Open the third URL shown in the above figure and you will see a page like the following one. Follow the instruction and you can build a completely customized webinar registration page. See a live sample at the RHUB website:

https://www.rhubcom.com/v4/web_conferencing/webinar_registration.html

©2005- R-HUB Communications, Inc. All rights reserved.